Top-Down RPG Shooter — Part 4 — Shooting

Welcome to Part 4 of the Top-Down RPG Shooter flash game tutorial. So far, we’ve set up the project, and added a player that moves with the arrow keys and rotates to face the mouse. In this part, we’re going to add bullets which the player can shoot by clicking and holding the mouse down.

The very basic concepts relating to shooting have already been covered in-depth in Part 10 and Part 11 of my Sidescrolling Platformer tutorial series, so this tutorial might seem a little faster paced. If you find yourself confused with the basic ideas, it might be a good idea to review those tutorials. (But don’t worry, I’ll still try to explain things clearly in this post, too :-)

Step One: Creating the Bullet MovieClip

Just as we did with the player, before we start programming the bullet with AS3, we need to draw it and link it to a class. I drew mine as a black rectangle, 20px wide by 6px tall — but as always, feel free to customize your own art to fit the mood and theme of your game. Be creative! When the art is finished, select it, Convert to Symbol, and link it to a class named “Bullet”, as outlined in the following screenshot:
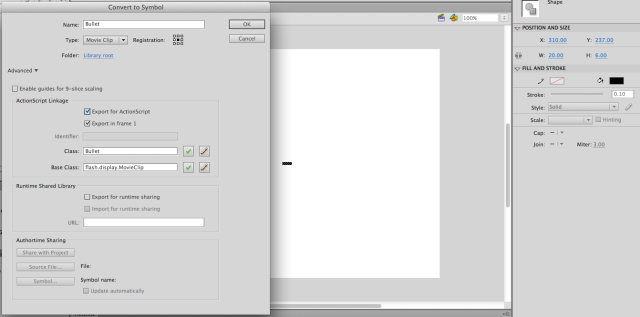
as3 flash game tutorial top down rpg shooter bullet class movie clip

Step Two: Create a simple Bullet.as class

Create a blank Actionscript 3.0 file (using File –> New… –> Actionscript File), and save it as “Bullet.as” in the same folder as your other project files. Start out by typing or pasting this block of code into Bullet.as. I included a bunch of comments in there to walk you through it.

Continue reading

Top-Down RPG Shooter — Part 3 — Player Rotation

Hey everyone! Here’s a super brief tutorial. Just to hold you over for another week while I write the next big one ;)

The Code

We’ll be modifying the Player.as class so that the player rotates in the direction of the mouse. It only takes a few lines of code. (You can actually do it in one line of code, I’m just spelling everything out to make it nice and simple.)

Put all of these lines inside the bottom of the loop function in the Player.as class.

//calculate these values, which we will use to determine the angle we need to rotate to
var yDifference:Number = stageRef.mouseY - y;
var xDifference:Number = stageRef.mouseX - x;
//this constant will convert our angle from radians to degrees
var radiansToDegrees:Number = 180/Math.PI;
//this final line uses trigonometry to calculate the rotation
rotation = Math.atan2(yDifference, xDifference) * radiansToDegrees;

Continue reading

Top-Down RPG Shooter — Part 2 — Player Movement

Welcome back to the second part of my “Top-Down RPG Shooter” flash game tutorial. In the last part, we set up a new project and linked it to an external Document Class, and we added the Player to the stage. In this tutorial, we’re going to program keyboard controls to move the player.

Step 1: KeyObject.as

We are going to make use of a really great open-source class called “KeyObject.as“. This class was written by a talented developer named senocular. It provides a really simple but powerful way to check which keyboard keys are pressed.

Copy and paste this class into a new .as actionscript file, and save it as “KeyObject.as” in the same folder as your main project:

package {

	import flash.display.Stage;
	import flash.events.KeyboardEvent;
	import flash.ui.Keyboard;
	import flash.utils.Proxy;
	import flash.utils.flash_proxy;

	/**
	 * The KeyObject class recreates functionality of
	 * Key.isDown of ActionScript 1 and 2
	 *
	 * Usage:
	 * var key:KeyObject = new KeyObject(stage);
	 * if (key.isDown(key.LEFT)) { ... }
	 */
	dynamic public class KeyObject extends Proxy {

		private static var stage:Stage;
		private static var keysDown:Object;

		public function KeyObject(stage:Stage) {
			construct(stage);
		}

		public function construct(stage:Stage):void {
			KeyObject.stage = stage;
			keysDown = new Object();
			stage.addEventListener(KeyboardEvent.KEY_DOWN, keyPressed);
			stage.addEventListener(KeyboardEvent.KEY_UP, keyReleased);
		}

		flash_proxy override function getProperty(name:*):* {
			return (name in Keyboard) ? Keyboard[name] : -1;
		}

		public function isDown(keyCode:uint):Boolean {
			return Boolean(keyCode in keysDown);
		}

		public function deconstruct():void {
			stage.removeEventListener(KeyboardEvent.KEY_DOWN, keyPressed);
			stage.removeEventListener(KeyboardEvent.KEY_UP, keyReleased);
			keysDown = new Object();
			KeyObject.stage = null;
		}

		private function keyPressed(evt:KeyboardEvent):void {
			keysDown[evt.keyCode] = true;
		}

		private function keyReleased(evt:KeyboardEvent):void {
			delete keysDown[evt.keyCode];
		}
	}
}

How do we use this class? Basically, we’re going to create an instance of it called “key” in our Player class (or wherever we need to access the keyboard controls). Then in that class, we can check the Boolean value of the keyObject’s isDown() function for specific keys. We can refer to keys by their unique keyCode. For example, if key.isDown(65) returns true, it means that the “A” keyboard key is currently being pressed.

Continue reading

Top-Down RPG Shooter — Part 1 — Setting Up

Hello everyone! If you’re reading this, that means you haven’t given up on AS3GameTuts, despite my year-long hiatus. Thanks for your patience!

Today I’m going to start up a brand new tutorial series that I’m really excited about. How to make a top-down RPG shooter game! This tutorial is going to be slightly faster-paced than my previous tutorials. If you haven’t programmed before, I’d recommend starting with my Pong series, and then proceeding with the Platformer before you attempt this. We will be coding using AS3 in external .as files, instead of using the timeline.

What is a Top-Down RPG Shooter?

Personally, I think this is a pretty awesome game genre. I find these types of games to be genuinely fun to play.

In case you’re unfamiliar with the genre, let’s break it down:

Top-Down

Top-down refers to the perspective of the game. The world is seen from a bird’s-eye-view, and the player can move around horizontally and vertically. Prominent examples include early titles in the Legend of Zelda and Pokemon series. These games both use tile-based maps, which our game will not, for simplicity’s sake. Instead, we will draw each map individually, giving the game a more unique, hand-drawn look. (You are, of course, welcome to modify the game to use tiles, but I won’t be doing it in this tutorial.)

Our game won’t have a scrolling map. Instead, our map will be built from a series of screens that the player can walk through. When the player walks off one edge of the screen, the map will flip to the next screen.

top down rpg shooter game pokemon map

Pokemon Ruby and Sapphire feature great tile-based top-down maps.

Continue reading

POLL: What should my next tutorials cover?

Hey everyone, I know I haven’t personally written a tutorial in awhile, but I’m planning on writing a few in the upcoming months. I want to make sure I cover the material that you would all most appreciate. This is your chance to let me know what you want to learn.

If what you really want to learn isn’t on this list, or if you want to vote for multiple answers, just leave me a comment.

Personally I’m leaning towards the top-down shooter, because I’m getting a bit bored of the other series — but if you all vote I promise to go with the winner.

Thanks for your input,

Ben


PS. I’m still looking for guest writers. If you’re interested in giving back to the community by writing a tutorial, email me at as3gametuts@gmail.com

PSS. If you want to be more involved in the AS3GameTuts community, join the forum, here: http://as3gametuts.forumatic.com

Sidescrolling Platformer – Part 13 – Enemy Interactivity

As I announced in the last post, I am extremely busy right now. Luckily for you, a member of the community has already stepped up and written a Part 13 for this side scrolling tutorial! In this tutorial, you’ll learn to create “bumper” objects for your enemies to interact with, which will let them patrol back and forth. You’ll also look for collisions between the player and the enemies, so you can take damage in your game. Cool!

I’ll hand it over now to the newest guest writer around here, Ed Nordmeyer (thanks, Ed!)

Ben covered creating enemies and making them disappear when they’re shot in lesson 12, so in lucky lesson 13, in this guest tutorial, I’ve picked up where the last lesson left off in the side scrolling platform game.

This will cover making the enemies move, how to block them in so they’ll patrol in a simple side-to-side motion, and have them interact with your player if they touch you. Following in Ben’s footsteps, if I had to choose between making the code readable or making the code ultra efficient and take up the least amount of lines, I tried to make the code as easy as possible to understand.

Creating the Bumper class

If you’ve followed the tutorial steps so far, you’ll find that creating the bumper class is very, very similar to the other classes made so far. For the artwork, I just made a square that was about a 25×25 pixels in size. I created this block on the background layer outside of what the player screen shows when you’re running the game. We’ll go back and made the blocks transparent later, but for now I’d recommend making them easy to see to help placing them on the screen from our code.

Continue reading

My Story — Our Site

Hi everyone. Thanks for sticking with the site and forum, despite my lack of activity.

I think you deserve a bit of an explanation about my recent disappearance.

I started programming when I was 13, using MIT’s revolutionary software, Scratch. Five years later, thanks to an amazing online community of teachers and tutorials, I’ve worked on many Flash games, I’m a professional iPhone/iPad app developer, and I’m currently sitting in an MIT dorm, getting ready for my freshman year to begin! It’s been quite the ride of teaching and learning to program over these 5 years!

Needless to say, the transition to college is a big one, and my free time has dwindled. I expect my workload to be intense, and therefore I can’t commit to being very present on the site and forum in the near future.

I wish I could say this is the end of my hiatus, but I can assure you that I haven’t abandoned AS3GameTuts.

I’ll try to check in every once in a while, and keep the site up-to-date. If you want to contribute to the site in any way during my absence, feel free to reply here, send me an email at as3gametuts@gmail.com, or send me a message on the forum. Perhaps you’d like to write a guest-post tutorial, or you’ve assembled a group of links, tips, news, etc that would be helpful to post on the site. Honestly, I’m not making any money off of the site (I’m actually losing a few dollars per year for the domain name). The site is my way to “pay it forward” to a community that has given so much to me. If you’d like to contribute to this effort as well, let me know (don’t worry, I’ll give you credit/rights/etc to any content you contribute).

And hopefully after a little while I’ll settle into a good rhythm and perhaps have the time to start writing full-length tutorials again!

Cheers,
Ben

News! AS3GameTuts Discussion Board

After some debate, I’ve decided to create a discussion board for AS3GameTuts.com

It’s a simple, free forum, but I think it will do a good job at expanding the “comment” sections of this site.

You can find it here: http://as3gametuts.forumatic.com/

Hello Everyone, and welcome to AS3GameTuts’ new discussion board!

When I first started the AS3GameTuts website, I had only a few readers, and so it was easy for me to answer everyone’s questions, and respond to each comment individually. But now, the number of comments and support emails I am receiving is making it impossible to give everyone the attention I’d like to. This forum is how I’m attempting to solve this problem.

By creating an open, shared, easily-navigable discussion board, I am hoping that you will all have an easier time finding answers to your questions. Maybe you will find that someone has had a similar problem to your own, and found a solution. Or perhaps you can help another reader with a problem of their own.

This is also a great place to hear the latest news about the site, and to leave me a suggestion about future tutorials you would like to see written on AS3GameTuts.

Anyways, thanks for all your support, and welcome to the forum!


Please join the AS3GameTuts community on this discussion board, and let me know what you think!

Ben Reynolds

Sidescrolling Platformer — Part 12 — Basic Enemies

Welcome back to the side scrolling tutorial series. In this session, we will be adding (very) basic enemies to the game, which you can shoot and destroy with the bullets we created previously. This will create a lot of possibilities for what you can do with your game. In later tutorials we will add a scoring system and more advanced A.I. (artificial intelligence) to the enemies, but for now let’s focus on: creating the Enemy class, adding a few enemies to the game map, and destroying them when they are hit by a bullet.

Creating the Enemy Class

Creating the Enemy class is very similar to creating the Bullet class. If you just read Part 10 and Part 11, most of this step will look the same as when we made the Bullet class and symbol.

First, we need art. We need to create a Movie Clip object to represent the enemy on the stage. Feel free to decorate your enemy however you choose — it could be a random, inanimate object, a crazy monster, or anywhere in between.

Continue reading

Sidescrolling Platformer — Part 11 — Fixing the bullets

Although we did get some functional bullets last time by using the Bullet class, we still need to make some major improvements. First of all, the bullets are added directly to the stage and have no idea about the scrollX and scrollY variables, so they don’t react when the player moves left, right, up, or down. Also, the bullets move at a sluggish pace — if they did react to the player’s movements, you could practically outrun them. Finally, they are never actually removed from the stage, so we waste precious memory that slows down the game. Imagine that we fired 1,000,000 bullets. The game would still be keeping track of all of them, constantly updating their positions, even if they are no longer on the stage. There’s some more code we can add to the bullets to handle all of this, and we are going to implement it in this tutorial.

Continue reading